Bot Integration Type
For the Conversation Account, Integration type can be selected to be Botpress, Custom or AI.
1. Botpress Adapter
Botpress is an open-source platform for developers to build chatbots. For integration with the Business Messenger app, you need to host Botpress v12 on your own, or you can contact our Sales team for more information about a hosted version on our servers.
1.1 Configuration for Botpress API
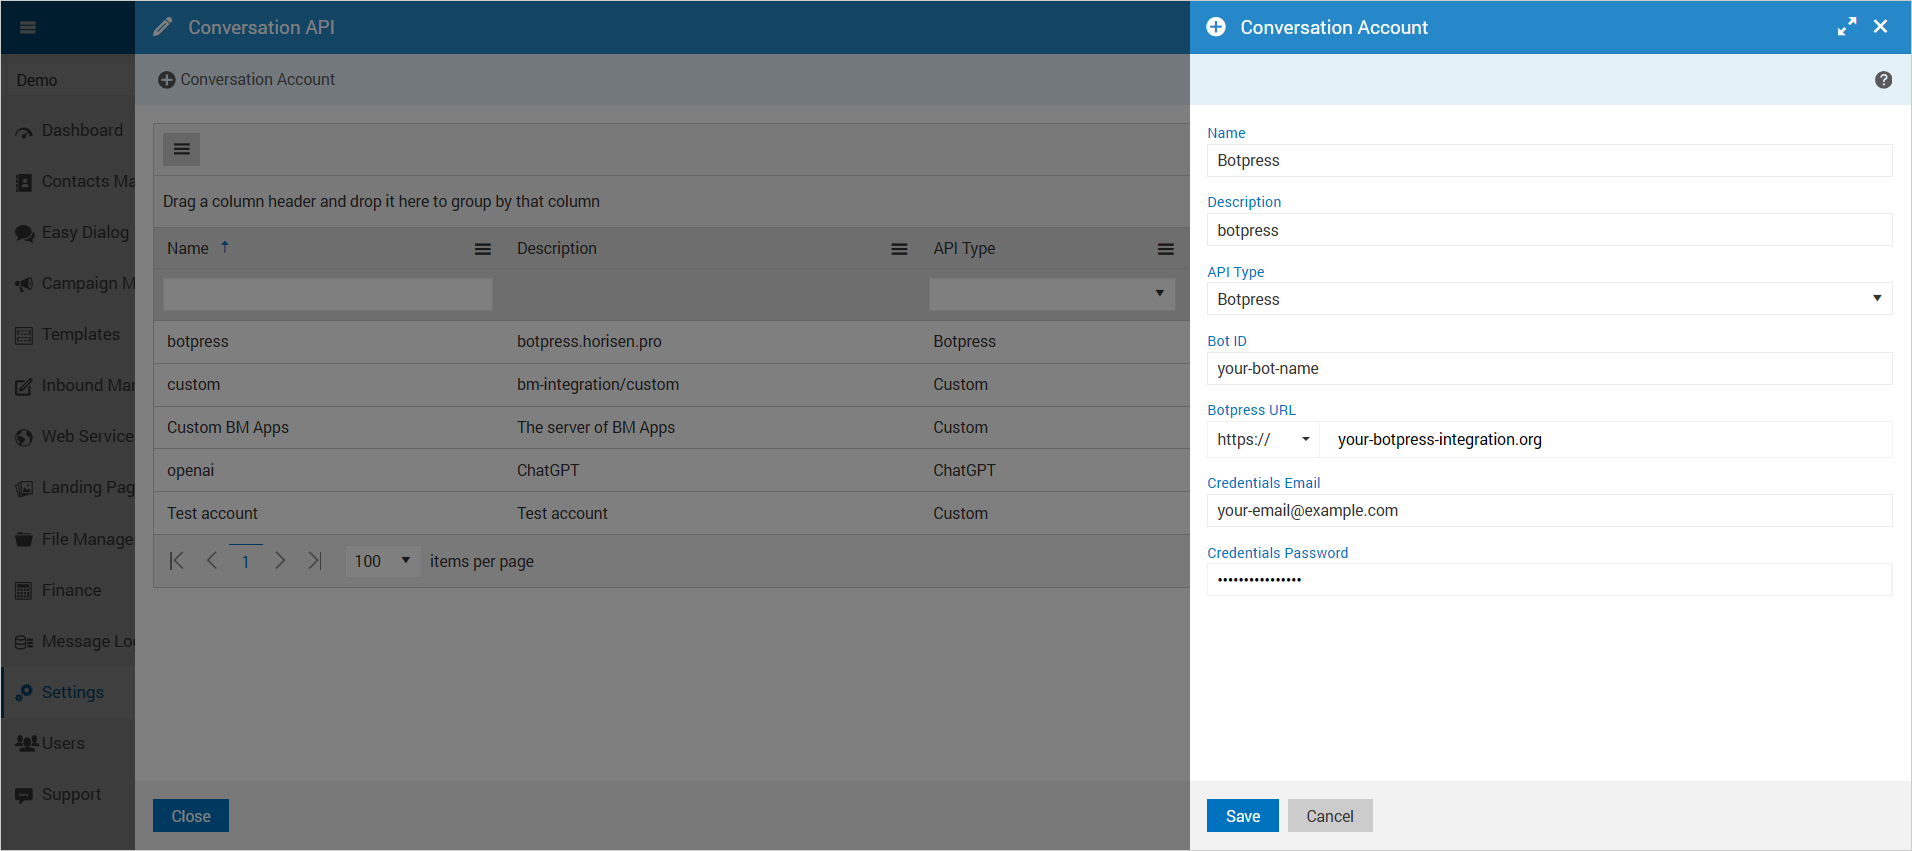
In order to configure Botpress in the Business Messenger app, the following data are needed:
Bot ID - The bot ID is given on the botpress dashboard. The Bot name is not accepted as a valid value.
Botpress URL - The URL for the botpress server, e.g. http://botpress.com:3000.
Credentials Email - The email that is used for the botpress account.
Credentials Password - The password for the botpress account.
1.2 Botpress Inbound
The Business Messenger Conversation API will send the following inbound messages to Botpress Converse API in the following format:
| Message Type | event.type or event.payload.type | Content Field | Content Description |
|---|---|---|---|
| Text | text | event.payload.text | Message text. |
| Picture | image | event.payload.image | URL to the image file. |
| Audio | audio | event.payload.audio | URL to the audio file. |
| Video | video | event.payload.video | URL to the video file. |
| File | file | event.payload.file | URL to the file. |
| Location | location | event.payload.latitude, event.payload.longitude | Latitude and longitude numbers. |
| Response | response | event.payload.response, event.payload.responseData | event.payload.response will contain response type: e.g. question, order, formevent.payload.responseData will contain actual response data as a JavaScript object. |
1.3 Botpress Outbound
All types of the Botpress outbound messages are supported: text, image, single choice messages, card, carousel, file, video, audio, location, etc.
Also, multi-message responses are supported.
2. Custom Adapter
Integrating the Conversation API via Custom adapter provides the most flexibility for automatic message responses while being very simple to understand and implement. The implementer is expected to develop a single webhook endpoint available at a public URL. It will receive all inbound messages as requests and it is expected to respond in the specific format to those requests, which will be processed and forwarded to the end users as automatic message responses.
2.1 Configuration for Custom API
The following data are needed:
Webhook URL - The webhook URL to which POST request will be sent with an inbound message.
Signature - Signature key is a random string for signing and validating requests (preferred to be UUIDv4, but it can be anything).
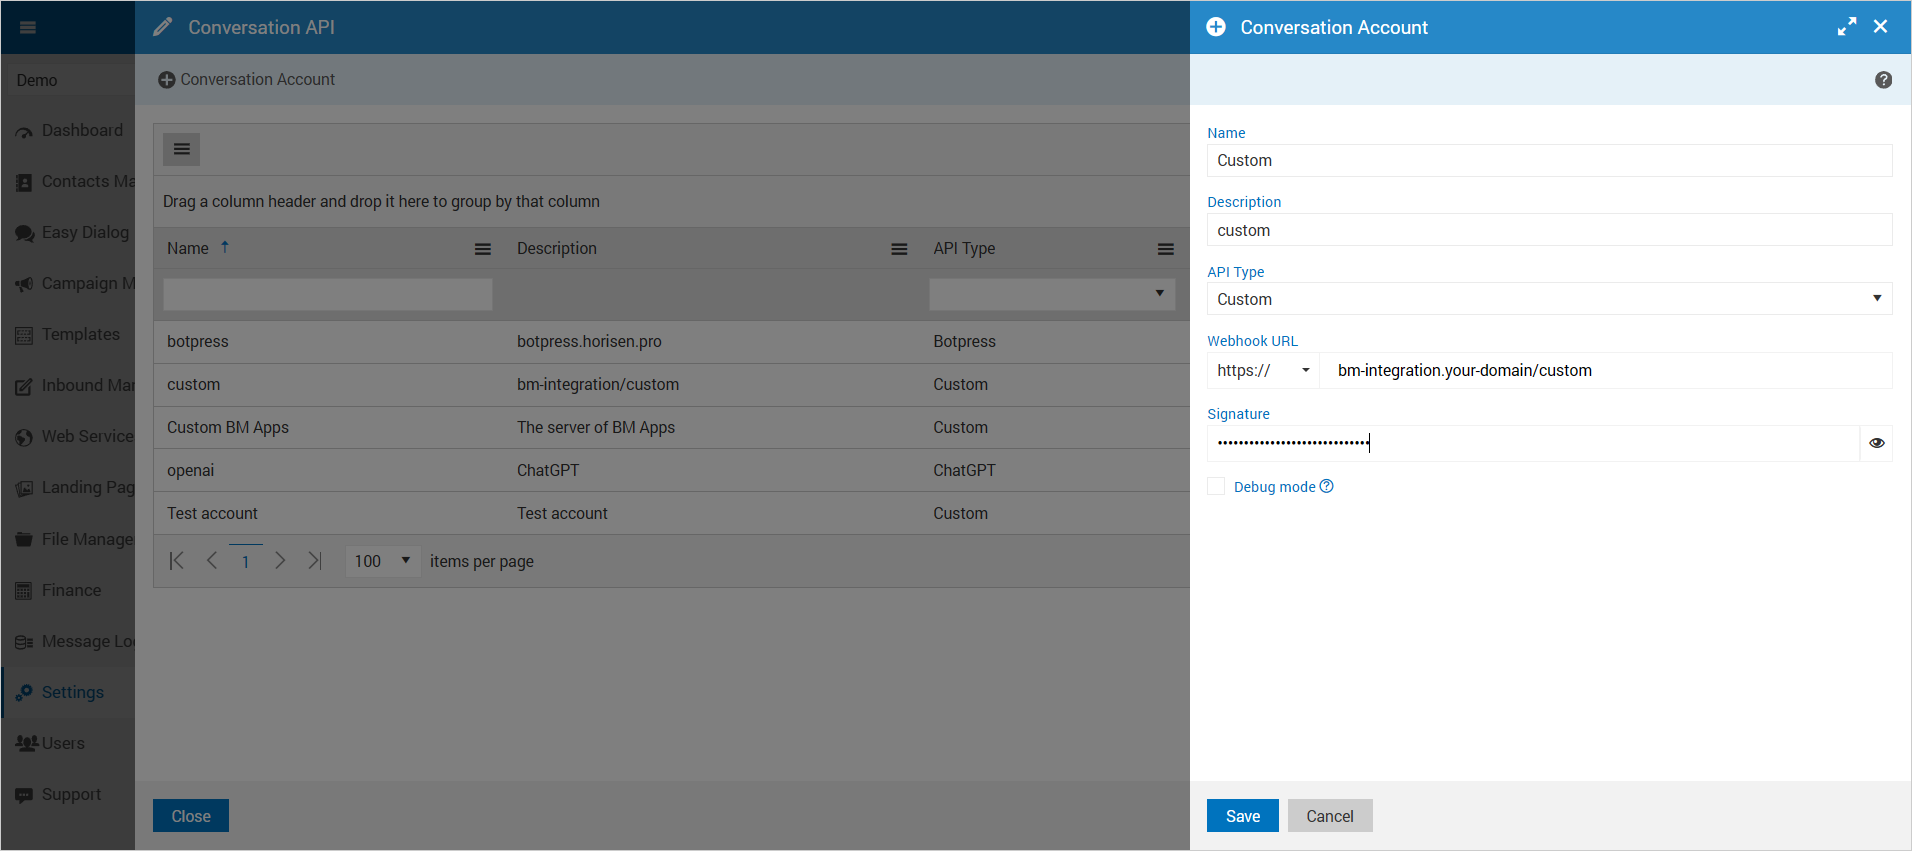
Debug mode can be activated by selecting the "Debug Mode" checkbox located at the bottom of the configuration form in the Custom Adapter settings. It enables error reporting requests to help in identifying issues in bot responses. More details about Debug mode can be found in 2.4 Debug Mode section.
For Custom API a lot of different message types are supported for inbound and outbound traffic. Each inbound request data (what we send to the Custom API) is signed with the signature key from a configuration with sha512 algorithm, which is base64 encoded. The signature key will be in the request header field [X-BM-Signature]. The exact function for signing a request is this:
return base64_encode(hash_hmac('sha512', $jsonRequestData, $signature, true));
This way it is possible to check authenticity of the request.
2.2 Inbound Requests
These requests represent what we send to Custom webhook endpoint. The base format for the request is presented below:
{
  "serviceUuid": "d354fe67-87f2-4438-959f-65fde4622040",
  "dialogUuid": "237a9b91-f7dd-4a49-939d-af95820d84a0",
  "channel": "telegram",
  "message": {
    "from": "1014279770",
    "providerMsgID": "497",
    "allowedChannels": [
      "telegram"
    ],
    "body": {
      "textMessage": {
        "content": "Hello"
      }
    }
  },
  "contact": {
    "uuid": "ae77ee16-1f77-4617-a5f0-c17b5483b730",
    "mobile": "+4163456568",
    "first_name": "John",
    "last_name": "Smith",
    "language": "en",
    "birthday": "1991-09-24",
    "channel_identifiers": "1014279770,+4163456568",
    "channel_names": "telegram,whatsapp",
    "channel_opt_statuses": "in,in",
    "created_dt": "2023-01-04T15:07:09Z",
    "opt_status": "in",
    "status": "active"
  }
}
The request contains the following details:
serviceUuid - UUID for the Business Messenger account.
dialogUuid - Internal UUID for Easy Dialog conversation. It can be used to differentiate the conversations.
channel - From which channel the message arrived. Possible channels: SMS, Telegram, Facebook, Instagram, RCS.
message - Main JSON object with message data. See message object definition.
contact - Object with a contact data from the Business Messenger app. Contact fields without value might be omitted or presented with null value. See contact object definition.
2.3 Webhook Response
After the request is received and data is processed, in the response we expect an outbound message that we will send to the user who sent the message. Format supports multiple messages in one response.
JSON examples of a response are presented below:
1. An example of a response with a picture message:
{
  "messages": [
    {
      "body": {
        "textMessage": {
          "content": "Hello John Doe"
        }
      }
    },
    {
      "body": {
        "pictureMessage": {
          "url": "https://www.apple.com/v/macbook-air/n/images/overview/hero_endframe__ea0qze85eyi6_large.jpg",
          "name": "MacBook Air"
        }
      }
    }
  ]
}
2. An example of a response with a location and a suggestion messages:
{
  "messages": [
    {
      "body": {
        "textMessage": {
          "content": "Hello John Doe"
        }
      }
    },
    {
      "body": {
        "locationMessage": {
          "latitude": 37.3348,
          "longitude": -122.0089,
          "text": "Apple Park",
          "url": "https://www.google.com/maps/place/Apple+Park/@37.3346438,-122.011166,17z/data=!3m1!4b1!4m5!3m4!1s0x808fb596e9e188fd:0x3b0d8391510688f0!8m2!3d37.3346438!4d-122.008972"
        },
        "suggestionsMessage": {
          "suggestions": [
            {
              "text": "Website",
              "openUrl": {
                "url": "https://www.apple.com"
              }
            }
          ]
        }
      }
    }
  ]
}
3. An example of a response with a card carousel message:
{
  "messages": [
    {
      "body": {
        "textMessage": {
          "content": "Hello John Doe"
        }
      }
    },
    {
      "body": {
        "cardCarouselMessage": {
          "content": [
            {
              "media": {
                "url": "https://www.apple.com/v/macbook-air/n/images/overview/hero_endframe__ea0qze85eyi6_large.jpg"
              },
              "title": "MacBook Air",
              "description": "Power. It’s in the Air.",
              "suggestions": [
                {
                  "text": "Visit",
                  "openUrl": {
                    "url": "https://www.apple.com/macbook-air/"
                  }
                }
              ]
            },
            {
              "media": {
                "url": "https://www.apple.com/v/apple-watch-series-7/d/images/overview/hero/hero_intro_hardware__fg5bn8mfky2q_large.jpg"
              },
              "title": "Apple Watch Series 7",
              "description": "Full screen ahead.",
              "suggestions": [
                {
                  "text": "Visit",
                  "openUrl": {
                    "url": "https://www.apple.com/apple-watch-series-7/"
                  }
                }
              ]
            }
          ]
        }
      }
    }
  ]
}
Webhook Response contains the following details:
messages - The main array of objects for the responses. It can be an empty array, or there can be more than one message. Each item in the array represents a separate message.
messages.body - Each message must have a body object with the actual Message object.
The received response we'll transform to one or more messages and send back as a response message. All messages will be presented in the Easy Dialog app conversations.
Custom Webhook endpoint, is used for the integration of external systems regarding Inbound and Outbound Traffic. This endpoint should understand our payloads.
2.4 Debug Mode
When debug mode is enabled, in case your response gets rejected by our validation system, the webhook endpoint will get another request containing just error information. You can use this information for troubleshooting. You are not expected to return any specific content on this request. You can return an empty string.
JSON example of an error reporting request is given below.
{
  "debugInfo": {
    "error": "Invalid webhook response Code: no_content, message: No content in message body, description: Message body does not include required content, items: [API ERR ITEM=[message:no_content:Message body does not include required content]]",
    "request": "{\"serviceUuid\":\"d354fe67-87f2-4438-959f-65fde4622044\",\"dialogUuid\":\"237a9b91-f7dd-4a49-939d-af95820d84af\",\"channel\":\"telegram\",\"message\":{\"from\":\"1014279771\",\"providerMsgID\":\"570\",\"allowedChannels\":[\"telegram\"],\"body\":{\"textMessage\":{\"content\":\"bot-error\"}}},\"contact\":{\"birthday\":\"1988-08-06\",\"title\":\"?️\",\"uuid\":\"ae77ee16-1f77-4617-a5f0-c17b5483b736\"}}",
    "response": "{\"messages\":[{\"body\":{\"textMessage\":{\"contentX\":\"Hello\"}}}]}"
  }
}
3. AI Adapter
By selecting the "AI" option for the "Integration Type", you can select an AI model provider, or you can use a custom URL of an API endpoint, that accepts OpenAI-compatible chat completion requests (Google, Anthropic, xAI (AKA Grok), Mistral AI, DeepSeek, etc.).
In order to configure Bot integration with an AI provider in the Business Messenger app, you have to create an account on an AI provider platform and generate an API key.
Note: Your secret API keys will not be displayed again after you generate them. Store your secret API keys in a secure, private location.
3.1 Configuration for AI Adapter
In the Business Messenger app, visit Settings > Integration > Conversation API page , and click "Add Conversation Account" button.

The following actions are needed:
-
In the opened window, add Name and Description for the Conversation account. For Integration Type, select the "AI" option.
-
The Base URL select field allows you to select an AI provider from the list, or you can specify a custom URL of an API endpoint, that accepts OpenAI-compatible chat completion requests. The list includes Google, Anthropic, xAI (AKA Grok), Mistral AI, DeepSeek, etc.
-
Fill in your API Key for the selected AI provider. After you sign up for an account with an AI provider, you have to generate your API key on the AI provider's platform.
Note: Store your API keys in a secure, private location. -
Select a Model. The AI models are predefined sets with different capabilities and price points. Detailed information please find on the AI provider's pages.
For example, more info about OpenAI models you can find on OpenAI Models page.
-
Custom Instructions - you can set optionally custom instructions text so that you can tailor AI to better meet your needs. Custom instructions allow you to add preferences or requirements that you would like AI to consider when generating its responses. Note that using "Custom Instructions" parameter, increases billable token usage.
-
History - AI does not have built-in memory of previous conversation replies. The way to simulate this, is to resend a certain number of recent replies on each new request. Note that using "History" parameter, increases billable token usage.
-
Set the Max Tokens - the maximum number of tokens that can be generated in the chat completion. This value can be used to control costs for text generated via API. AI models process text by breaking it down into tokens, which are common sequences of characters found in text. The exact limit of tokens varies by model.
-
Set the Temperature parameter. It controls randomness: Lowering results in less random completions. As the temperature approaches zero, the model will become deterministic and repetitive.
With these settings saved, the AI bot can be enabled for sending responses in the Easy Dialog app.