WhatsApp Channel Setup for BM Account
1. Introduction
The WhatsApp channel for the Business Messenger app account can be set up either by using the Embedded Onboarding for WhatsApp Channel and the Meta App that the Platform Owner is already created for the WhatsApp channel setup for the instance level, or with Independent Setup, by creating a new Meta App and use it only for the Business Messenger app account.
Before you start the WhatsApp channel setup for the Business Messenger account, check with the platform owner what are available options for WhatsApp setup method.
Important: Check WhatsApp Messaging Limits
2. Embedded Onboarding
Embedded Onboarding is an authentication and authorization interface flow that enables the Platform Owner to quickly activate WhatsApp messaging services for their business customers with minimal manual setup. Upon successful completion, Embedded Signup returns customer's WABA ID, business phone number ID, and an exchangeable token code.
The flow allows the Business Messenger app's Account owner to easily setup the WhatsApp channel. When these steps are completed, as onboarded business customer for WhatsApp channel, you must add a payment method, before you can begin messaging. As a Tech Provider, Platform Owner does not have credit lines. Instead, business customers onboarded by a Tech Provider, will be billed by Meta.
2.1 Setting Up the Channel
Please follow the steps below.
-
Navigate to the Settings > Channels section of the Business Messenger app, and select the WhatsApp option.
-
A new window will be opened, where you have to select the Use Provider's App (Embedded Onboarding) option.

-
For Phone Verification PIN set a PIN for business phone number's two steps verification. The PIN must be exactly six digits long.
-
Click the Facebook Log In button to start the Embedded Onboarding process with Meta. You will be guided through the Facebook Login for Business to connect your WhatsApp business account.

You have to select the business assets you want to share with the Meta App: your Meta Business portfolio and WhatsApp Business Account. Add your WhatsApp phone number, and verify it. At the end of the process, you will be able to review the data you set. Connecting your account may take a few moments.
-
To compete your the Business Messenger WhatsApp channel setup, you need to add a payment method using the WhatsApp Manager. Click the "Add payment method" button.

After the process is completed, please note that Meta will review your business to ensure it complies with WhatsApp's Commerce Policy. Click the Finish button.
Click the Save button to save the changes.
3. Independent Setup
In case that the option Allow Independent Apps is enabled on the instance level, as the Business Messenger app Account Owner you can use your own Meta App for setting up the WhatsApp channel.
In the Settings section for the WhatsApp channel, select the Use My Own App (Independent Setup) option. You will need the following details:
WA Business Account ID - the ID of your WhatsApp Business Account. This ID is provided by Meta.
Facebook App ID - the Facebook (Meta) App ID is the ID of your Meta app, and it can be found in the App Dashboard. Note: The App has to be separated Meta App just for setting up the WhatsApp channel.
Facebook App Secret - the Meta App Secret is a string provided by Meta, and is only visible in the App Dashboard.
WA Access Token - the token is a string that is required to authorize the WhatsApp. The token is provided by Meta.
After setting up this configuration, from the Business Messenger app UI you will get the Webhook URL and a Verify token, and these details you will have to enter into your Meta App configuration to finish the settings for the channel.

In case you need additional information, find details below.
3.1 Setting Up the Channel
The following instructions are the key elements for setting up the channel when Independent Setup is selected.
3.1.1 Meta Business Account
Meta Business Manager allows organizations to bring their Facebook Pages, Instagram and WhatsApp accounts, and other business assets together, so they can manage them from one place with business tools.
Note: The Meta Business Account, sometimes called a Business Manager account, was renamed. It's now known as a Business Portfolio.
3.1.1.1 Create Meta Business Account
For setting up the WhatsApp channel, you can use your Meta Business Account if you already have one, or you can create a new one by going to Meta's page for creating Business Account.
Find here more details on how to Create a business portfolio in Meta Business Suite.
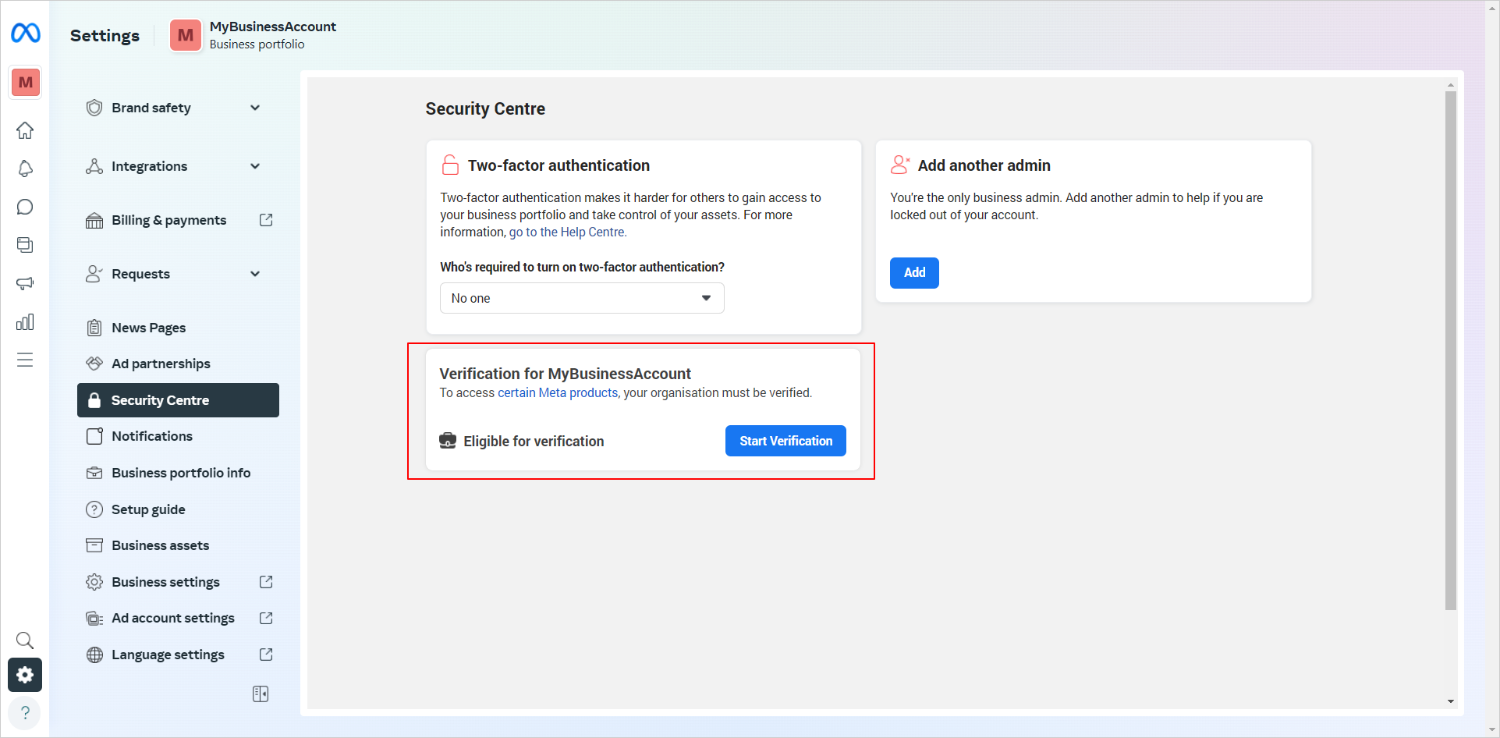
3.1.1.2 Submit your Business Account for Business Verification
Submit your Business Account for "Business Verification". Business verification confirms that Meta Business Account belongs to an actual business or organization.
From Meta Business Suite for your Business portfolio, navigate to Security Centre section and click the "Start Verification" button.
More information and steps of the verification process, please find here:
3.1.2 WhatsApp Business Account
Businesses all over the world use WhatsApp to communicate with their customers. With the WhatsApp Business Platform Cloud API you can directly integrate your application with WhatsApp.
For setting up the WhatsApp channel, you can use your WhatsApp Business Account if you already have one, or you can create a new one.
Find more details here about WhatsApp Business Accounts.
3.1.3 Meta App
Before you can create a Meta App that you will need for the process, you need a Meta developer account. If you don't already have a developer account, you can register for a new one.
3.1.3.1 Register as a Meta Developer
To register, you can go to the Meta for Developers website and click Get Started button.
If you need help on how to register as a Meta Developer, please visit Meta for Developers page for further details.
3.1.3.2 Create an App
Before you start creating a Meta App, you need to be logged into your Meta developer account.
Navigate to developers.facebook.com/apps and click "Create App" button. A new window will be opened, where:
-
For the App details section, add App name, and App contact email. Click the Next button.

-
For the Use cases section, select the Connect with customers through WhatsApp option. Click the Next button.

-
For the Business section, select your business portfolio you want to connect to this app. Click the Next button.
-
For the Requirements section, just click the Next button.
-
From the Overview page, check the details you selected for your app. Click the "Go to dashboard" button.
In case you need more details about creating an App, please visit How to create an App Meta's page.
3.1.3.3 Basic App Details
From the Dashboard page of your Meta App, navigate to side menu App settings > Basic section, and add the needed details for your App. Add the following:
- App icon
- Contact email
- Privacy policy URL
- Terms of Service URL
- for the Category, select Messenger bots for business
- for the Data Protection Officer contact information section, add the needed data.
Note: Find in the page your App ID and App Secret data. You will need this details for the channel setting process.
Click the "Save changes" button.
3.1.3.4 App Customization and Requirements
From the Dashboard for you App, in the App customization and requirements section, do the following:
-
Click the Customize the Connect with customers through WhatsApp use case option.

A new page will be opened, where you have to select the API Setup from the left side menu.

Within the API Setup page, you will find some basic developers tools to get you started. Find on the page the following details you need for the BM WhatsApp channel setup process:
- WhatsApp Business Account ID
- To start sending messages to any WhatsApp number, add a phone number by clicking the Add Phone Number button.

3.1.4 Meta Business Account System User
To generate an access token, navigate to Meta Business Suite for your Business Portfolio.
You will need a system user in order to get a permanent access token for your Meta app, the one you'll need for setting up the WhatsApp channel in the Business Messenger app.
3.1.4.1 Create a System User
To create a system user, visit Meta page Create System User for your Meta Business Account. Click Add button.

Create System User by adding a System user name, and selecting a System user role to be "Admin".

By clicking on the Create System User button, System User will be created.
3.1.4.2 Assign Assets for the System User
You have to add your App as an asset to the System User. Select the option "Add Assets" in the drop-down list under the three dots icon on the right side.
In the opened window:
- for Select assets type section, select Apps,
- for Select assets section, select your App,
- for Assign permissions section, activate Manage app option.
Click the button "Assign assets". The App is assigned to the System user.

3.1.4.3 Generate Token
To generate a token, click the Generate Token button for the System user.

In the opened dialog window:
- for Select app section, select your app from the list, and click the Next button.
- for Set expiration section, choose Never for Token expiry.
- for Assign permissions section, select two permissions from the list, to be granted for your App:
whatsapp_business_messagingandwhatsapp_business_management. (see the screenshot below)
Click "Generate Token" button.

The permanent token will be created. Click the Copy button to copy the token.
Important: You have to copy and save this token as it won't be stored at Facebook.
Now you can start setting up the WhatsApp channel in the Business Messenger app.
3.1.5 Setting Up the BM WhatsApp Channel
In order to set up the WhatsApp channel, navigate to the Settings > Channels section and click on the WhatsApp channel option.

In the opened window, select the Use My Own App (Independent Setup) option.

Add the following details:
WA Business Account ID - The ID of your WhatsApp Business Account. This ID is provided by Meta and can be found on your App page WhatsApp section. From the App Dashboard, click the Customize the Connect with customers through WhatsApp use case option, then API Setup.
Facebook App ID - The Facebook App ID is the ID provided by Meta. Meta App has to be separated Meta App just for your WhatsApp Business Account. Find this info in the Basic section under App Settings side menu item of your Meta App.
Facebook App Secret - The Meta App Secret is a string provided and only visible in your App Dashboard. Find this info in the Basic section under App Settings side menu item of your Meta App.
WA Access Token - Your Meta Business Account generated permanent token.
By clicking on the Save button, a new pop-up window will appear with additional details for the channel setup, the Webhook URL and the Verify Token.
Important: To complete the WhatsApp channel setup, you need to copy the Webhook URL and the Verify Token presented here in the Business Messenger app, back into the WhatsApp Configuration page for your Meta App.
Navigate to Meta for Developers page for your App. From the App Dashboard, click the Customize the Connect with customers through WhatsApp use case option, then Configuration.
In the Webhook section, populate the Callback URL and the Verify token fields. Click the Verify and save button to save Webhook URL and Client Token.
Note: Callback URL is the URL that Meta will be sending the events to. Verify token is set up by the BM app for the webhook endpoint.

Within the Webhooks fields section, find and set the following fields:
-
messages - set the option to Subscribe. This ensures that messages will be sent to callback URL when they are received.
-
user_preferences - set the option to Subscribe. The user_preferences webhook enables real-time tracking of user consent and preference changes. When a user updates their “Offers and announcements” settings in WhatsApp to stop or resume delivery of marketing template message from your business, the system will automatically opt-out or opt-in the user for the WhatsApp channel accordingly. This ensures compliance with WhatsApp policies while respecting customer preferences. Important: Inbound Rules for "/start" and "/stop" must be configured in your Business Messenger account for the WhatsApp channel.

The settings is done, and the WhatsApp channel details will be presented on the channel page.

Clicking on the QR code icon ![]() will open a new window where the WhatsApp channel details are presented. The QR code allows a user to access information instantly. Scanning the QR code with the scanner on a mobile phone, will open WhatsApp.
will open a new window where the WhatsApp channel details are presented. The QR code allows a user to access information instantly. Scanning the QR code with the scanner on a mobile phone, will open WhatsApp.
3.1.6 Setting Up the Opt-in/Opt-out Rules
Opt-in/Opt-out Rules should be created in the Business Messenger app Inbound Manager > WhatsApp section.
Creating Opt-in/Opt-out rules is very important. Without defined Opt-in/Opt-out rules and configured keywords, no contacts will be stored, since there is no definition about if and how to store new contacts.
If the Easy Dialog default contact list is set up in the Settings > General > Default Settings section, which is recommended, all the contacts that send a message to the Business Messenger app by using WhatsApp channel, will be saved in the Easy Dialog default contact list.
4. WhatsApp Messaging Limits
Messaging limits are the maximum number of business-initiated conversations a business phone number can start in a 24-hour period.
Business phone numbers are initially limited to 250 business-initiated conversations in a 24-hour moving period, but this limit can be increased.
There are four levels of messaging limits applying to businesses that have completed the business verification:
- 1000 business-initiated conversations
- 10 000 business-initiated conversations
- 100 000 business-initiated conversations
- An unlimited number of business-initiated conversations
These limits are designed to prevent spam and ensure high-quality messaging. The limits are tiered based on the business's phone number quality rating and user engagement.
WhatsApp monitors the quality of messages sent by businesses, categorizing them as High, Medium, or Low. A low-quality rating may lead to restrictions.
Understanding these limits helps businesses manage their messaging strategies effectively, ensuring compliance with WhatsApp's guidelines while maximizing engagement.
Please find more details on Meta's page About your WhatsApp Business phone number's quality rating.