Instagram Channel Setup for BM Instance
1. Introduction
In order to set up the Business Messenger app Instagram Channel on an instance level, every Business Messenger app Instance Owner has to have verified Meta Business Account with an App approved by Meta.
The following steps are required for the BM Instance Owner to go through. Please follow the instructions as follows.
If you already have the Business Messenger Facebook channel set up, you can use the same Meta Business Account and Meta App you developed for the BM Facebook channel. You can go directly to 4.4 Basic App Details step and continue setting up the Instagram channel.
2. Video Guide
This video guide provides detailed instructions for setting up the Instagram channel for the Business Messenger app instance and configuring necessary settings on the Facebook platform.
Please find below the details on how to set up the Business Messenger Instagram channel for an instance.
For the Meta App Review process details, please visit the 5. Meta App Review section of this document.
While your App is in development mode, for testing purposes if your App and your Business Messenger instance are functional in terms of messaging, you can define Roles for your App. Please find more details on how to 4.9 Test Your App in the section below.
3. Meta Business Account
Meta Business Manager allows organizations to bring their Facebook Pages, Instagram accounts and other business assets together, so they can manage them from one place with business tools.
Note: The Meta Business Account, sometimes called a Business Manager account, was renamed. It's now known as a Business Portfolio.
3.1 Create Meta Business Account
For setting up the Instagram channel, you can use your Meta Business Account if you already have one, or you can create a new one by going to Meta's page for creating Business Account.
Find here more details on how to Create a business portfolio in Meta Business Suite and Business Manager.
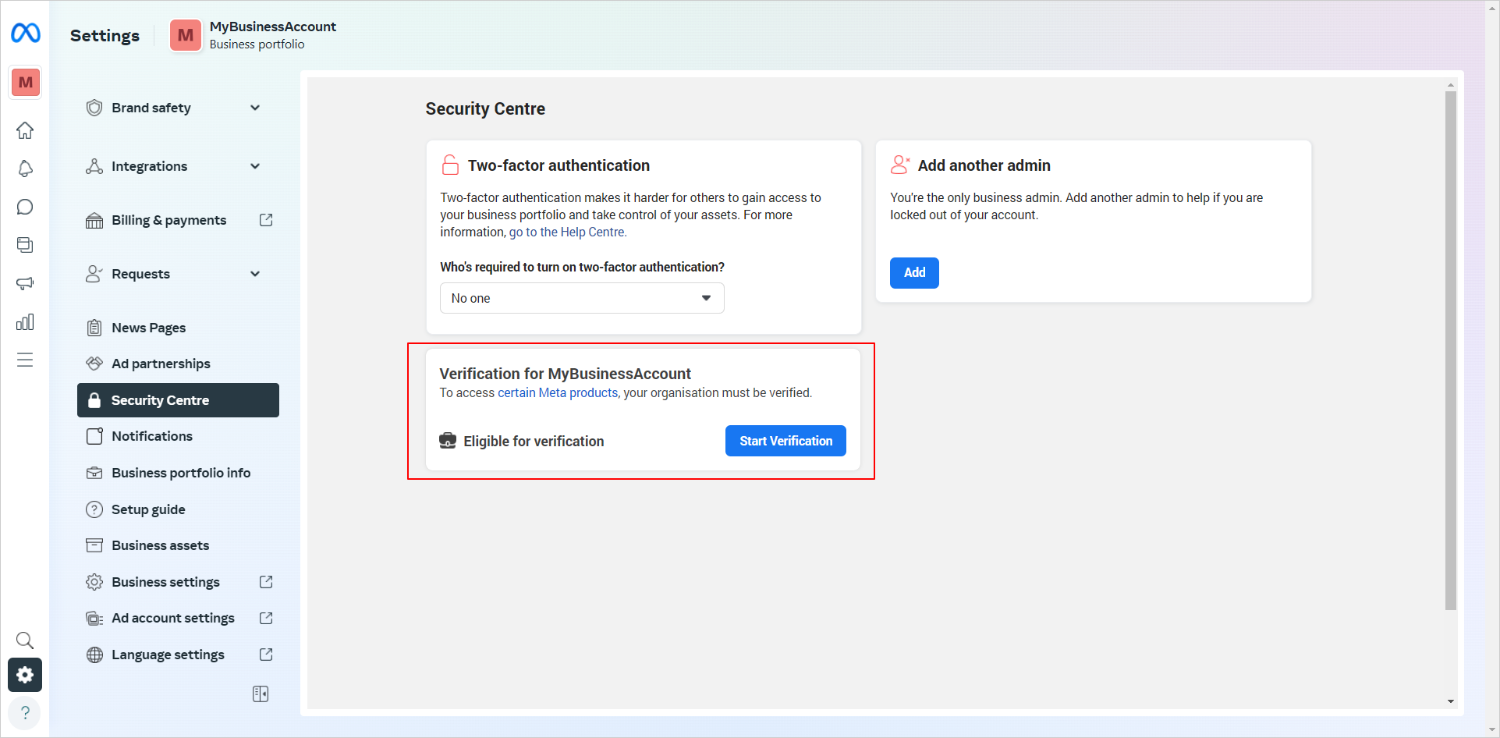
3.2 Submit your Business Account for Business Verification
Submit your Business Account for "Business Verification". Business verification confirms that Meta Business Account belongs to an actual business or organization.
From Meta Business Suite for your Business portfolio, navigate to Security Centre section and click the "Start Verification" button.
More information and steps of the verification process, please find here:
4. Meta App
Before you can create a Meta App that you will need for the process, you need a developer account. If you don't already have a developer account, you can register for a new one.
4.1 Register as a Meta Developer
To register, you can go to the Meta for Developers website and click Get Started button, or while logged into your Facebook account, go to developers.facebook.com/async/registration page.
If you need help on how to register as a Meta Developer, please visit Meta for Developers page for further details.
4.2 Create an App
Before you start creating a Meta App, you need to be logged into your Meta developer account.
Navigate to developers.facebook.com/apps and click "Create App" button.
4.2.1 App Use Case
For the App Use Case click Select an app type and click the Next button.

4.2.2 App Type
For the App type select Business and click the Next button.

4.2.3 App Details
Add an App name for your App and App contact email. Select your Meta Business Portfolio i.e.Business Account. Click "Create App" button.

In case you need more details about creating an App, please visit How to create an App Meta's page.
4.3 Add Products to Your App
Once the App creation flow is completed, your App will be loaded in the Meta App Dashboard. To add functionality to your app, you need to add Products to your app.
To add Products to your App, navigate to Dashboard from the side menu. On the Dashboard page go to Add products to your app section, and find the following products:
-
Messenger
-
Facebook Login for Business

4.3.1 Messenger
For the Messenger product, click on the "Set up" button. Messenger will be listed on the side menu under Products for your App, and a new page will be opened for Messenger API Settings. You will set here a webhook later once you have details from the Business Messenger app.

More about Meta Messenger Platform you can find on Overview for the Messenger Platform Meta's page.
4.3.2 Facebook Login for Business
Navigate back to Dashboard from the side menu. From the Dashboard page in Add products to your app section, find the Facebook Login for Business product and click on the "Set up" button. Facebook Login for Business will be listed on the side menu under Products for your App, and a new page will be opened for its Settings.
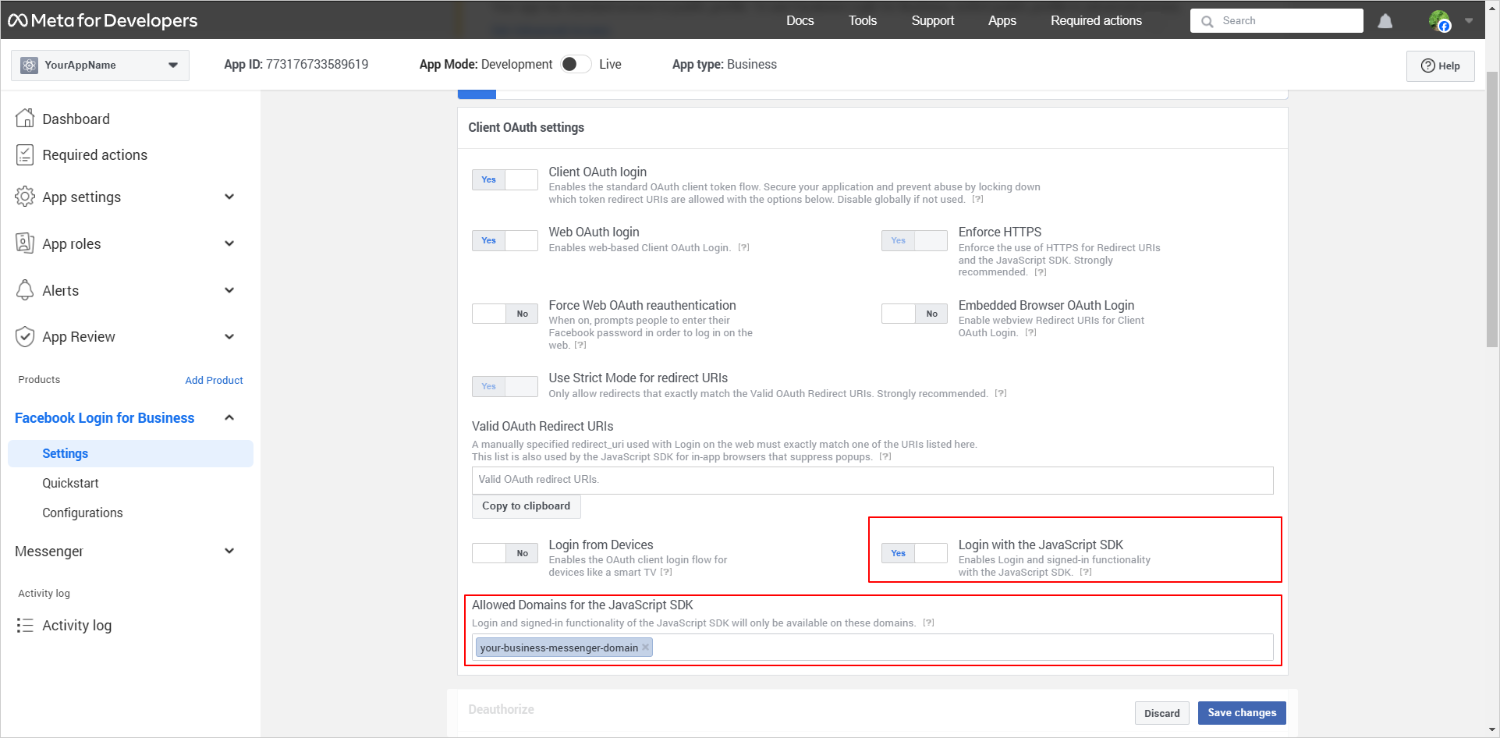
On the Settings page, go to the Client OAuth settings section and do the following:
-
For the Login with the JavaScript SDK option set "Yes".
-
For the Allowed Domains for the JavaScript SDK option, add your Business Messenger app instance domain.
Click "Save changes" button.
4.4 Basic App Details
From the Dashboard page of your Meta App, navigate to side menu App settings > Basic section and find in the page your App ID and App Secret data. You will need these data for the Business Messenger app Instagram channel setup.
4.5 Setup a Webhook
To receive messages and other events sent by Instagram users, the App should enable webhooks integration. You can set a webhook with a Verify Token and a URL you will get from the Business Messenger app.
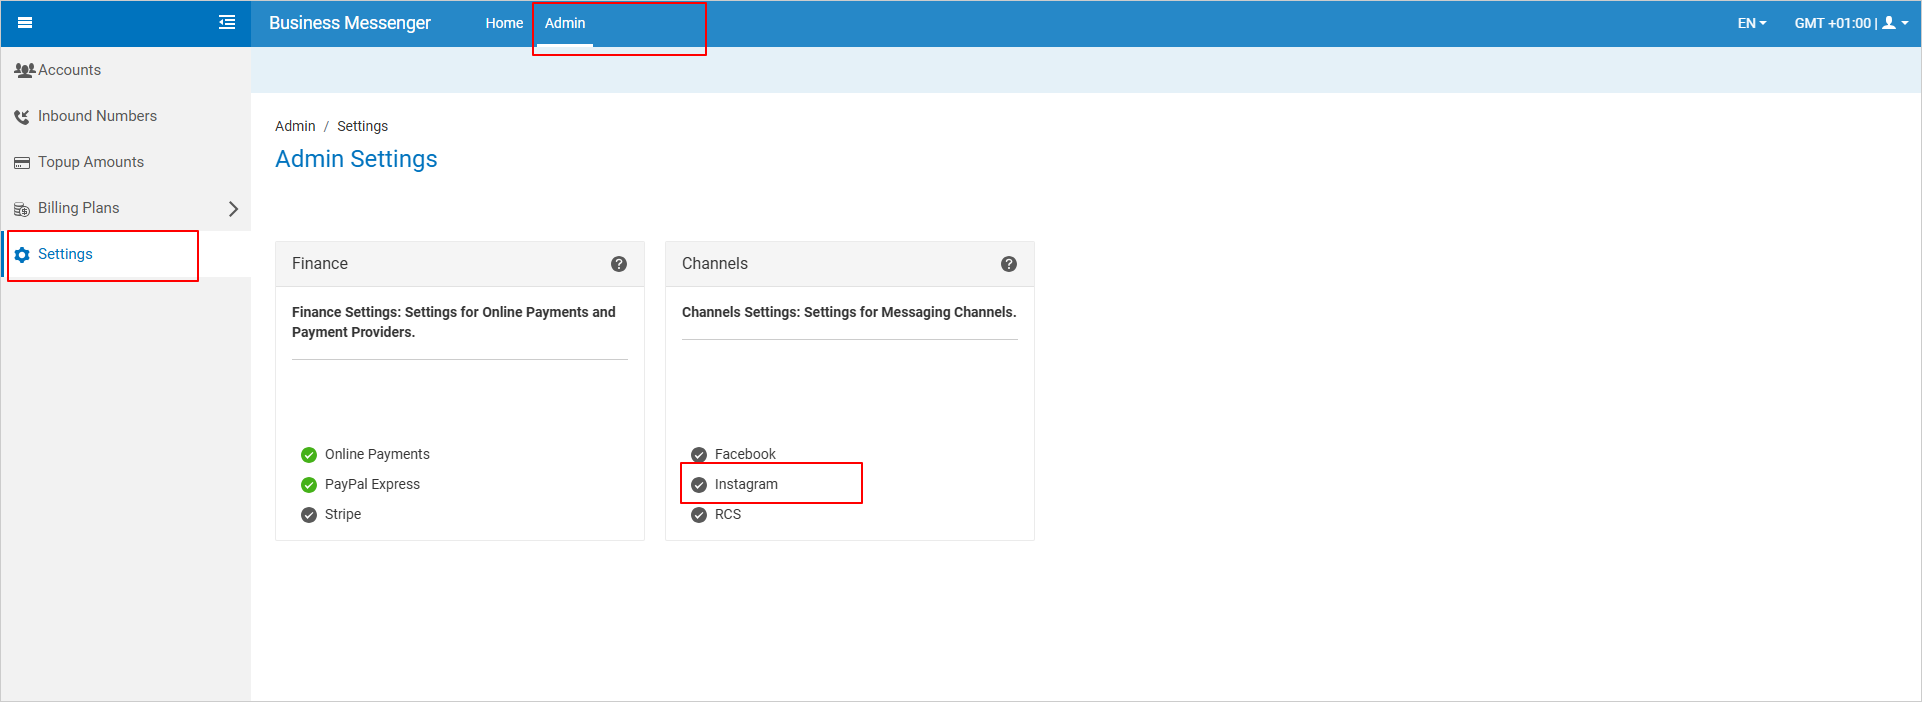
In order to get the Verify Token and the URL, please open the Business Messenger app's Admin > Settings section, and then settings for the BM Instagram channel by clicking the Instagram option. Please check details on the following screenshot.
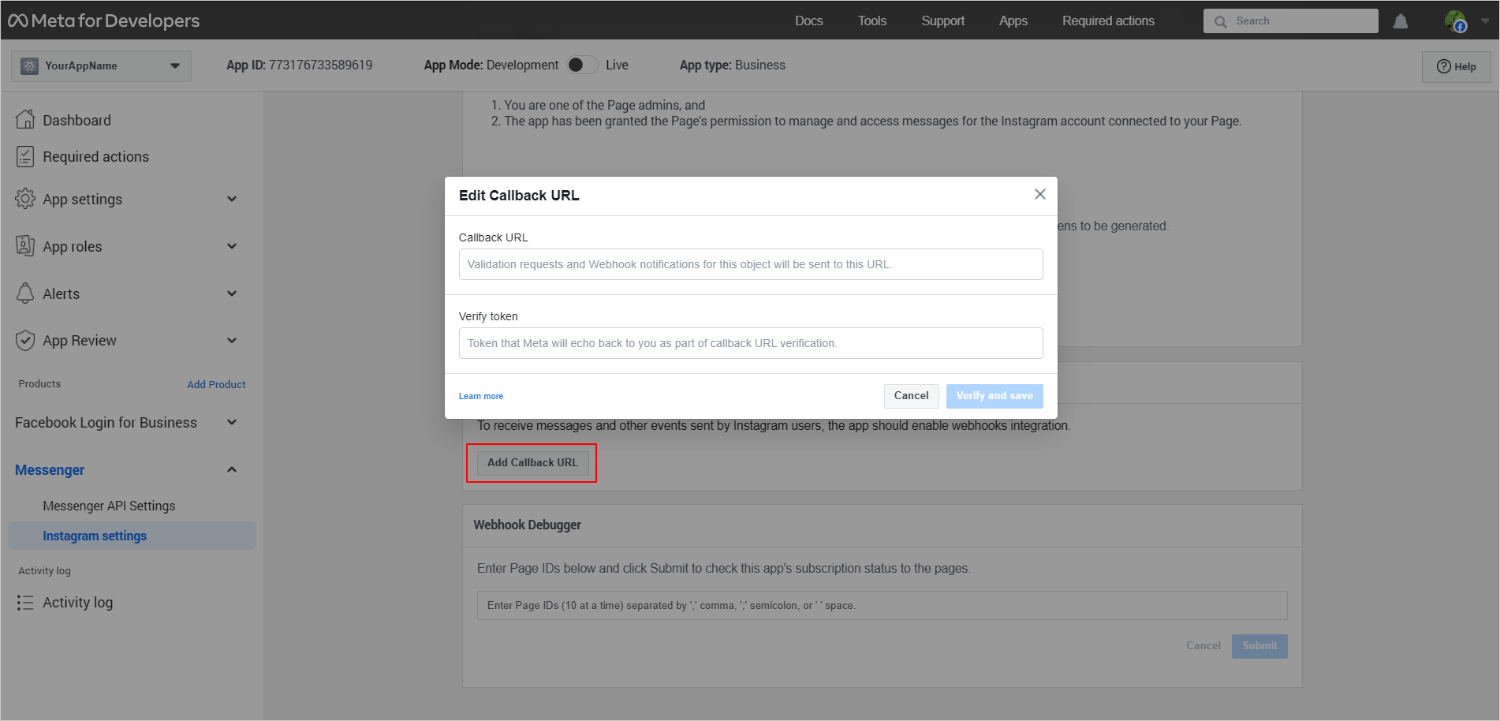
A new window will be opened where you can add your App ID and App Secret data from the 4.4 step of this document. After saving these data, a pop-up window will show the Webhook URL and the Verification Token. You need to copy these values and save them in your App.
To do so, go back to App Dashboard page for your App. Navigate to Messenger > Instagram Settings from the side menu to open the settings page. Find Webhooks section and click on the "Add Callback URL" button. A new pop-up window will be opened where you should fill in the data for Callback URL and Verify Token fields with the data you've got from the Business Messenger app.
4.6 Add Subscriptions
Add Subscriptions to subscribe to Meta webhook fields i.e. events for which you will be getting notifications. On the same page from the previous step Instagram Settings, in Webhooks section, click on "Edit Subscriptions" button. In the opened pop-up window check the check boxes for the following fields: messages, messaging_postbacks and message_reactions, and click the Save button.
4.7 Add Your App to Your Meta Business Account
You can skip this step if you already have the BM Facebook channel configured and you are using the same Meta App for setting up the Instagram channel.
You can add an App that you own to your Meta Business Account, by claiming it in Meta Business Suite for your Business Account.
Go to business.facebook.com for your Business Account, and navigate to Settings > Accounts > Apps. Click "Add" button and select Connect an app ID option. Enter your App ID and click the "Add App" button.
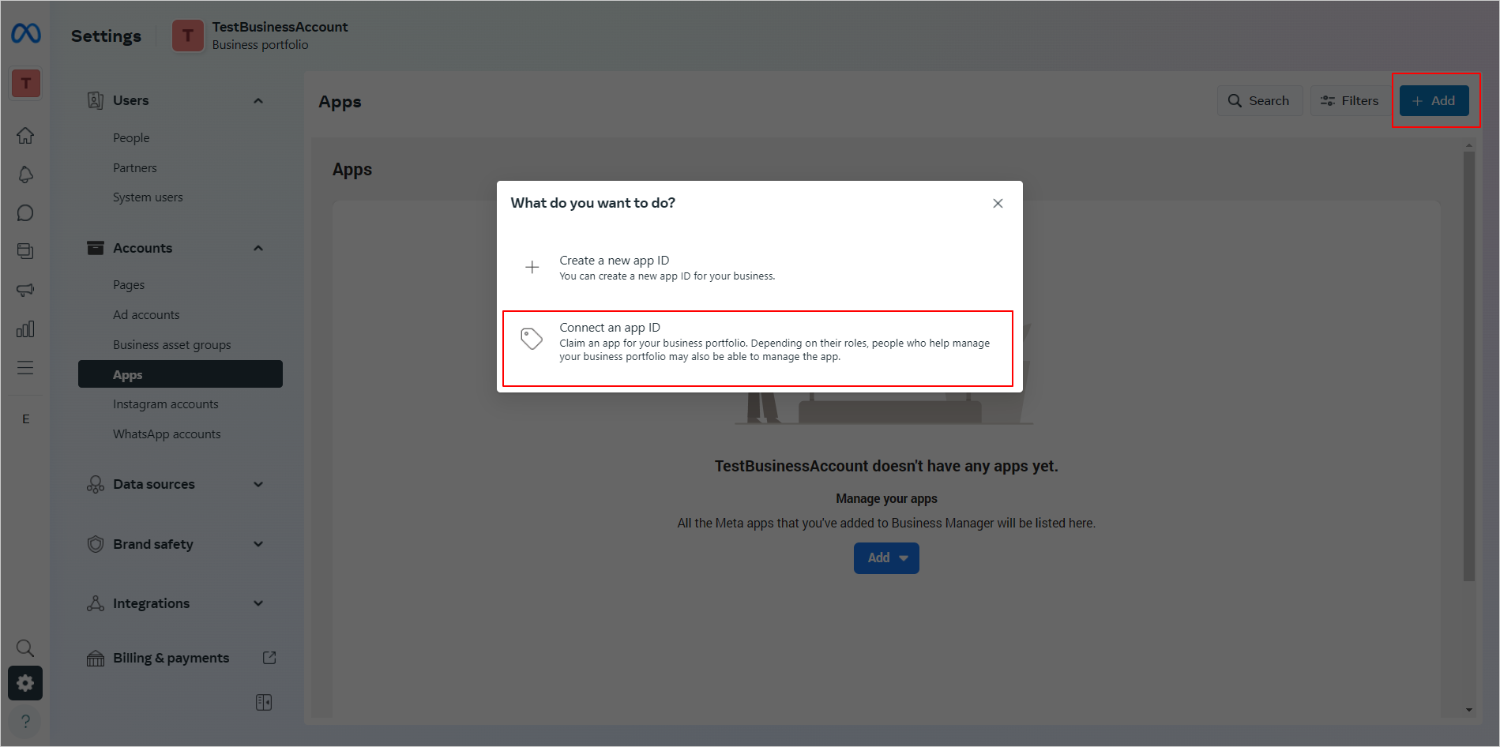
More details on how to add Apps to Meta Business Account please find on Add apps to your business portfolio page.
4.8 Pass Access Verification Process
You can skip this step if you already have the Business Messenger Facebook channel configured.
You will need to pass Meta's "Access Verification" process to verify that your business operates as a Tech Provider.
Navigate to Meta for Developers / Apps and select App settings > Basic for your App. Find on the page Verifications section. To start Access verification process, you need to have Business verification completed. In case you haven't completed it yet, you can start Business verification from this section.
To start Access verification, click the "Start verification" button in the Access verification section.
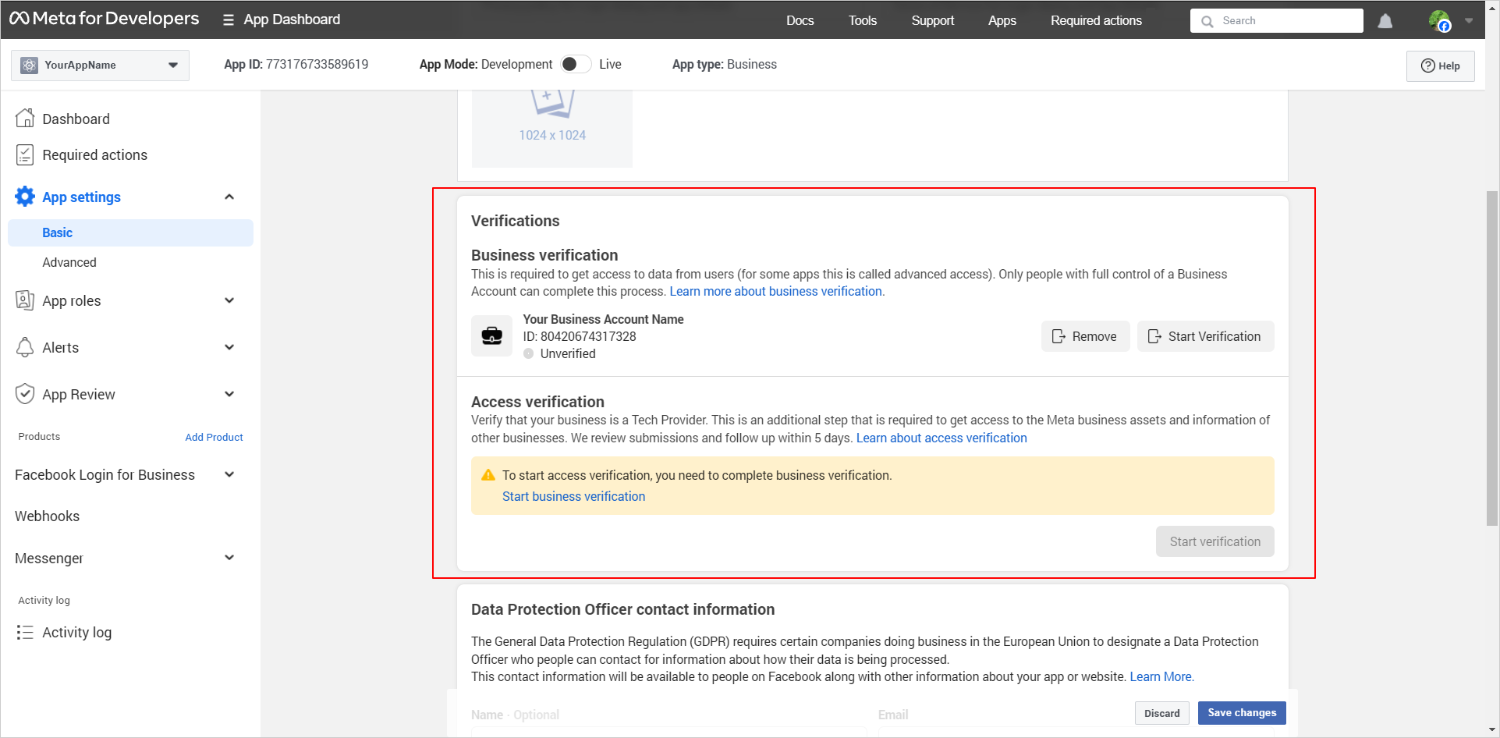
For more details please visit Access Verification Meta's page.
4.9 Test Your App
Your App is still in development mode and not yet publicly available. To test if your App and your Business Messenger instance are functional in terms of messaging, you have to define Roles for your App.
In this stage of your App development, only FB users with a Role for your App, can send messages to your Business Instagram account, and those messages can be received in the BM Easy Dialog app.
4.9.1 Assign a Role for Your App
App Roles allow you to control which people have permission to edit and view your App.
Details about Meta App Roles please find on App Roles Meta's page.
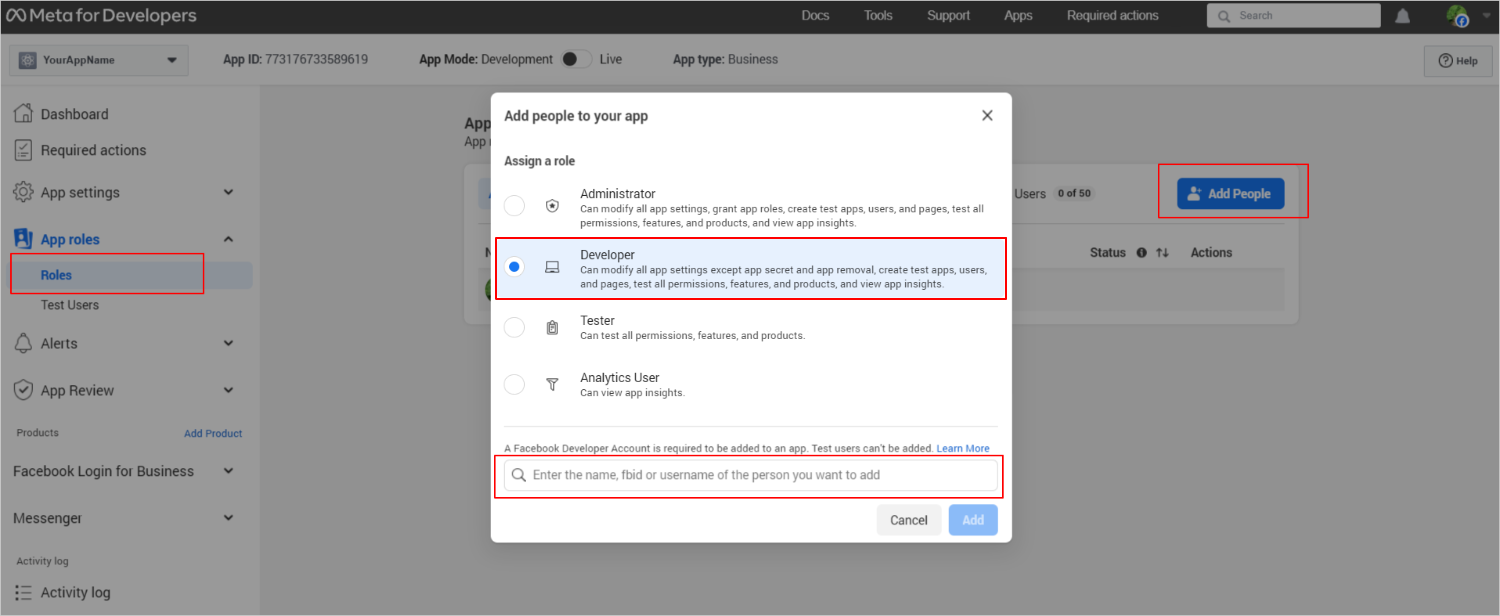
For testing purposes, you can give a Role to a person. Note: In order to give a role on your App, a person must have a Meta Developer Account.
Navigate to App roles > Roles and click the "Add People" button. Select e.g. Developer role and enter the name, FB ID or a username of the person you want to add. Click "Add" button. A role invitation will be sent and it must be accepted by the invited person.
Note: To be able to send messages to your IG Professional Account, a person with a Role on your App, must have FB and IG accounts connected in Meta Accounts Centre.
4.9.2 Connect Your Instagram Account with the Business Messenger App
Now you can visit How to set up Instagram Channel for the Business Messenger Account page in order to connect your IG account and FB Page with the Business Messenger account. After those settings are completed, the FB user with a Role on your Meta App, can start chatting with your IG account, the messages will be received in the BM Easy Dialog app, and you can respond to them directly from the Easy Dialog.
5. Meta App Review
In order to make your Meta App publicly accessible, which means here to start chatting with all IG users that correspond with your Instagram account, you have to go through App Review Meta's process.
App Review submissions can take review times of up to 10 days. Before you request permissions or features, take time to get familiar with App Review, Sample Submissions and Common Rejection Reasons Meta's documents.
5.1 Prepare for the App Review
App Review is an important part of the App development process. It enables Meta to verify that your App uses their products and APIs in an approved manner.
In short, the App review process consists of adjusting the application settings. This includes logo, description, various legality/TOS pages, help pages, etc. After that, Meta will require a short video clip where they can see how the App is used in the context of the Instagram Channel for the BM Easy Dialog. This means that you have to record how to set up the BM Instagram channel and how it is used in the Easy Dialog app (opt-in, chatting, etc). Also, you'll need to provide access to your platform to Meta team so they can test your implementation.
Docs and videos should be prepared for needed permissions and features for the Products that you added to your App.
The needed permissions are: pages_show_list, pages_manage_metadata, instagram_basic, instagram_manage_messages and business_management. The needed feature is Business Asset User Profile Access.
If the Facebook channel is already configured, you have to prepare docs and videos just for instagram_basic and instagram_manage_messages permissions, since the use of the others is already approved. For each permission/feature separate document and video are needed.
Note: Since your App is still in development mode, for recording videos you have to use FB account with already assigned role for your App. Only App Role users can chat with your IG account while App is in Development mode.
Please find additional help documentation regarding the App Review process here:
- App Review main page
- Guidance for Screen Recordings
- Guidance for Logos and Trademarks
- Common mistakes
- Messenger Platform Sample Submission
- App Review - Tutorial
- Guide if Your Submission was Rejected for App Verification Details
- Guide if Your Submission was Rejected for Messenger related Permissions and Features
- FAQs
- Ongoing Review - Best Practices
5.2 Submit Your App Review for Meta Approval
Once you have all required documents and videos prepared, submit your "App Review" for Meta approval for needed permissions and features.
Navigate to App Review > Permissions and Features section, and click "Request advanced access" buttons for permissions and features: pages_show_list, pages_manage_metadata, pages_messaging, business_management and Business Asset User Profile Access. Then click the "Edit App Review request" buttons and follow the Meta's instructions.
If the Facebook channel is already configured, you have to prepare documents and videos just for instagram_basic and instagram_manage_messages permissions, since the use of the others is already approved. For each permission/feature separate document and video are needed.